Getting Started
G-Node is available in two variants:
Physical G-Node (G-Node-P): A compact physical device;
Virtual G-Node (G-Node-V): A Docker container available at Docker Hub.
In this tutorial, we will use G-Node-V. To start, pull its image from Docker Hub:
docker pull pluraf/gnode
Run the image:
docker run -p 80:80 -p 443:443 -p 8883:8883 -p 1883:1883 --name gnode pluraf/gnode
Open your browser and navigate to https://127.0.0.1. If everything is set up correctly, you will see the following login page:

- To login, use default credentials:
Username- adminPassword- admin
The first time you access G-Node, your browser will likely display a warning message similar to:

This warning occurs because G-Node uses a self-signed SSL certificate, which browsers do not trust by default.
However, it is safe to proceed in this case. Click on Advanced (or a similar option) and then select Proceed
(or its equivalent).
Before proceeding further, we recommend reviewing the brief User Interface introduction.
MQTT - MQTT Pipeline
Imagine the following scenario: a temperature sensor transmits measurements via
MQTT to the topic /data/s1. Each message payload is a JSON object structured as follows:
{
  "temp": <value>
  "sensor_id": <value>
}
If the temp value exceeds 30, a message must be sent to the MQTT topic /alerts.
To achieve this behavior, we will design a Pipelines featuring two MQTT Connector and two Filtras.
-
Select
Authentication type- Username & Password;Fill in fields
Username- sensor andPassword- sensor;Click
Submitbutton.
Create pipeline with the
Pipeline ID- sensor-monitor and the following configuration:{ "connector_in": { "type": "mqtt", "topic": "/data/s1" }, "connector_out": { "type": "mqtt", "topic": "/alerts" }, "filtras": [ { "type": "comparator", "msg_format": "json", "operator": "gt", "value_key": "temp", "comparand": 30 }, { "type": "builder", "msg_format": "json", "payload": { "message": "Temperature limit exceeded!" } } ] }
Start pipeline by clicking the
Start Pipelinebutton on the Pipeline Details page.
To simulate the sensor and the alerts receiver, we use the popular Mosquitto MQTT client tools: mosquitto_sub and mosquitto_pub.
Subscribe to the topic /alerts:
mosquitto_sub -h 127.0.0.1 -p 1883 -P sensor -u sensor -t /alerts
mosquitto_sub will acquire the terminal and will be printing messages as they arrive.
First, let’s publish message with a temp below the threshold:
mosquitto_pub -h 127.0.0.1 -p 1883 -P sensor -u sensor -t /data/s1 -m '{"temp": 20}'
The terminal windows running mosquitto_sub will remain empty.
On the Pipeline Details page in the GUI you will see:
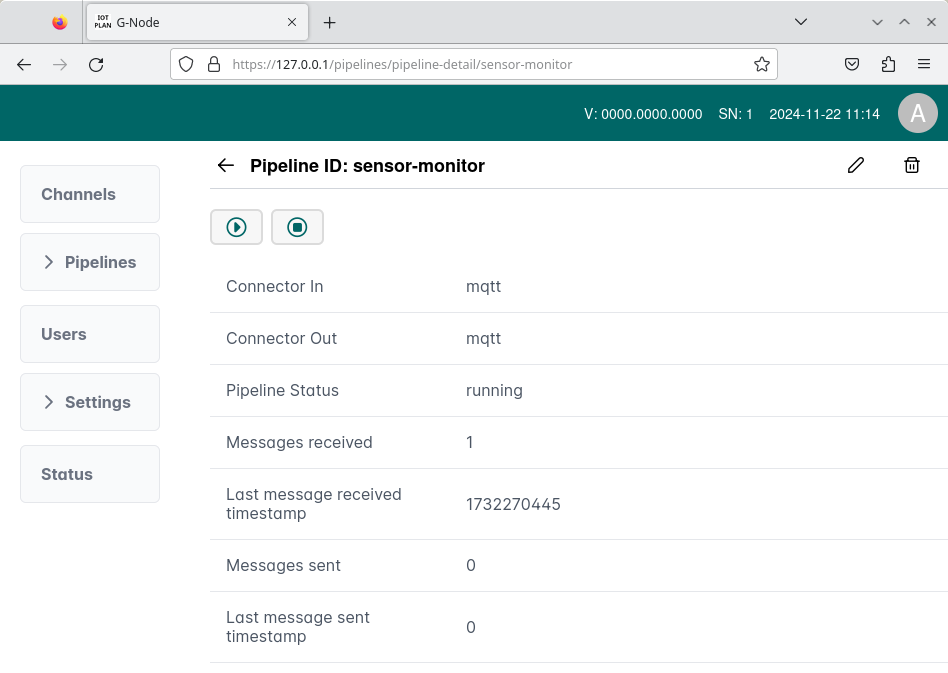
This indicates that the pipeline received the message, but it was filtered out by the filtra. Now, let’s publish a message that will pass through the filtra:
mosquitto_pub -h 127.0.0.1 -p 1883 -P sensor -u sensor -t /data/s1 -m '{"temp": 40}'
This time, mosquitto_sub should print: Temperature limit exceeded!. The statistics
on the Pipeline Details
page will also update accordingly:
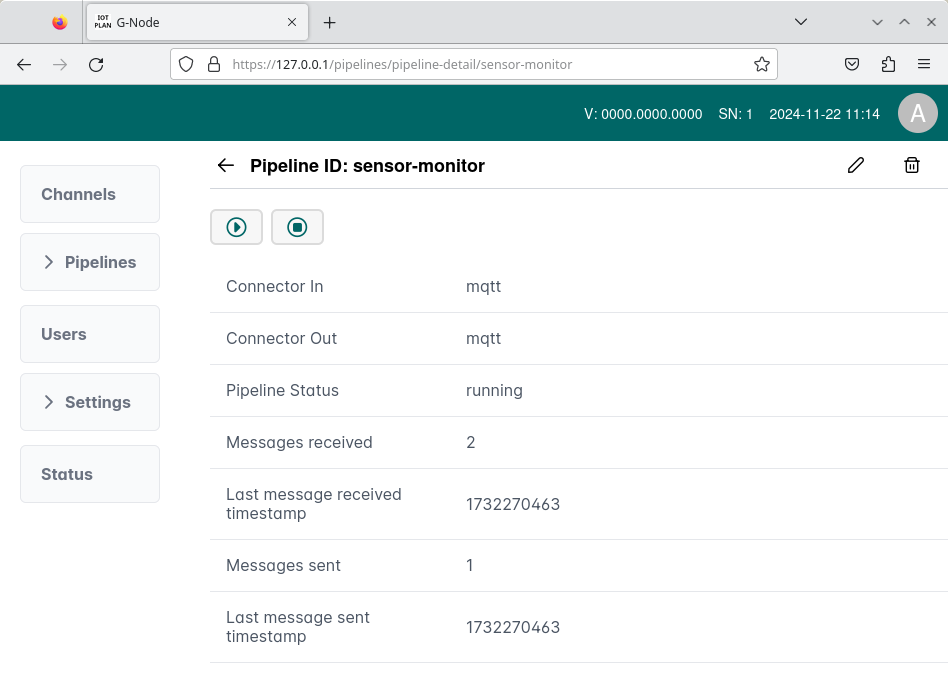
This example showcases G-Node ability to function as both a message broker and a data processing unit simultaneously. While we utilized G-Node’s built-in MQTT broker, the MQTT Connector can also connect to external MQTT brokers. In such cases, the pipeline can act as an MQTT bridge with advanced filtering and transformation capabilities.
MQTT - GCP Pub/Sub Pipeline
Let’s consider the following scenario: you have a network of devices sending updates over MQTT. You want these updates to be directed to the Google Cloud Pub/Sub service because your application relies on it as the primary messaging system. Additionally, we only want to forward messages with temperature values below 10 or above 30.
To follow this example, you will need the following prerequisites:
A Google Cloud account
Pub/Sub service activated
A service account
A service key
To create a service account, navigate to: https://console.cloud.google.com/projectselector2/iam-admin/serviceaccounts
Once created, the service account will appear in the list. Click on it and navigate to the KEYS
tab. Click the Add Key button and select the JSON key type.
The key file will be generated and automatically downloaded by your browser.
You will need this file later.
Now, let’s move on to the G-Node settings.
Create MQTT Channel:
Choose
Authentication type- Username & Password;Fill in fields
Username- sensor andPassword- sensor;Click
Submitbutton.
Create Authbundle:
Choose
Authbundle Id- gcp_key;Service- Google Cloud,Authentication type- Service Key;Click the
Broswe...button and choose the service key downloaded earlier;Click
Submitbutton.
Create pipeline with the
Pipeline ID- sensor-upload and the following configuration:{ "connector_in": { "type": "mqtt", "topic": "/data/s1" }, "connector_out": { "type": "gcp_pubsub", "project_id": "<project_id>", "topic_id": "data_s1", "authbundle_id": "gcp_key" }, "filtras": [ { "type": "comparator", "msg_format": "json", "operator": "gte", "value_key": "temp", "comparand": 10, "goto_rejected": "out" }, { "type": "comparator", "msg_format": "json", "operator": "gt", "value_key": "temp", "comparand": 30 } ] }
Replace
<project_id>onto your Google Cloud project id.
NOTE: Please be aware that Pub/Sub topic names can not contain / characters.
We use two Comparator Filtra in this setup. Note that the first filtra leverages
the goto_rejected property to ensure that rejected messages
(i.e., those with a temp value below 10) are also forwarded.
The keyword out is used to indicate that the message should bypass the remaining filtras
and go directly to the output connector.
To simulate the sensor and the alerts receiver, we use the popular Mosquitto MQTT client tool: mosquitto_pub.
First, let’s publish a message with a temp within the range:
mosquitto_pub -h 127.0.0.1 -p 1883 -P sensor -u sensor -t /data/s1 -m '{"temp": 20}'
On the Pipeline Details page in the GUI you will see:
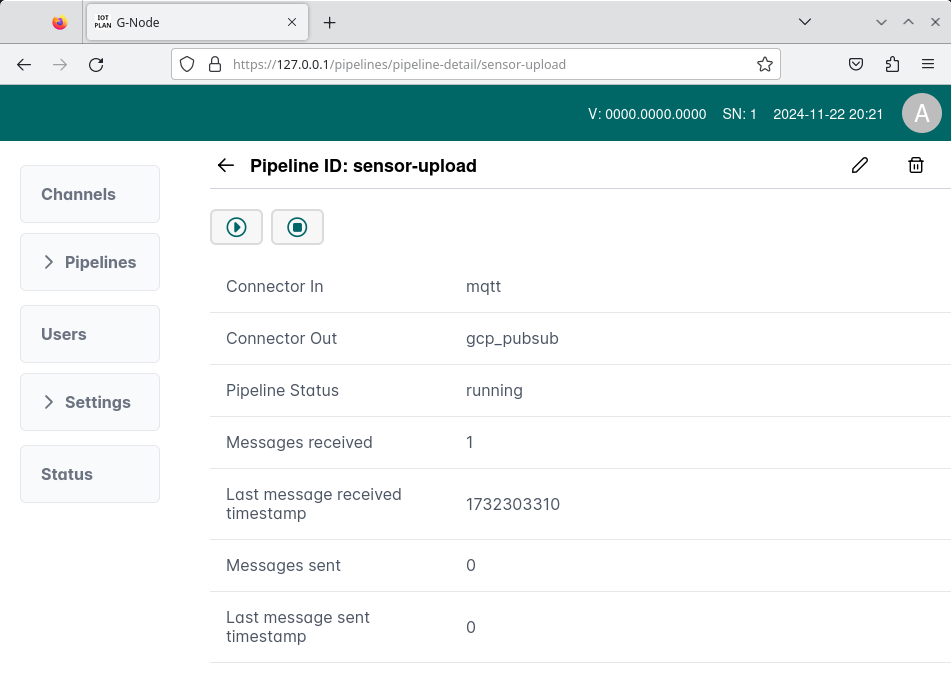
This indicates that the pipeline received the message, but it was filtered out by the filtra. Now, let’s publish two messages that will pass through the pipeline and will be sent to Pub/Sub:
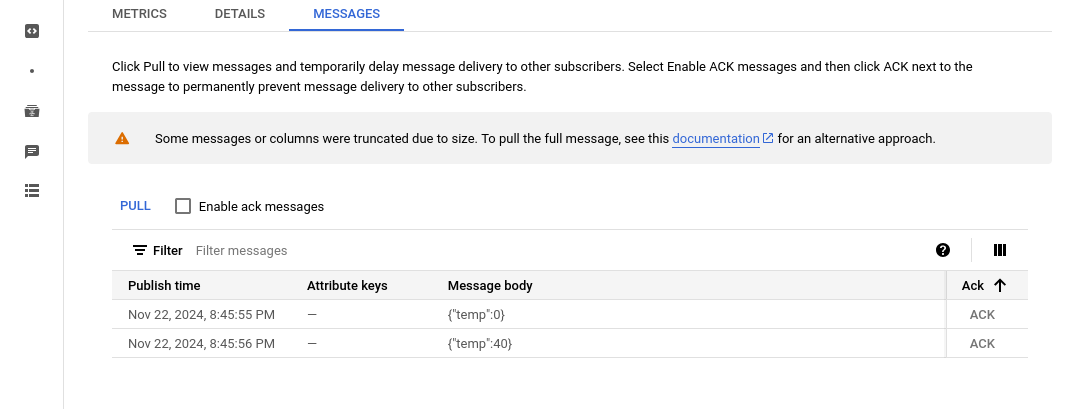
mosquitto_pub -h 127.0.0.1 -p 1883 -P sensor -u sensor -t /data/s1 -m '{"temp": 0}'
mosquitto_pub -h 127.0.0.1 -p 1883 -P sensor -u sensor -t /data/s1 -m '{"temp": 40}'
The statistics on the Pipeline Details page will also update accordingly:
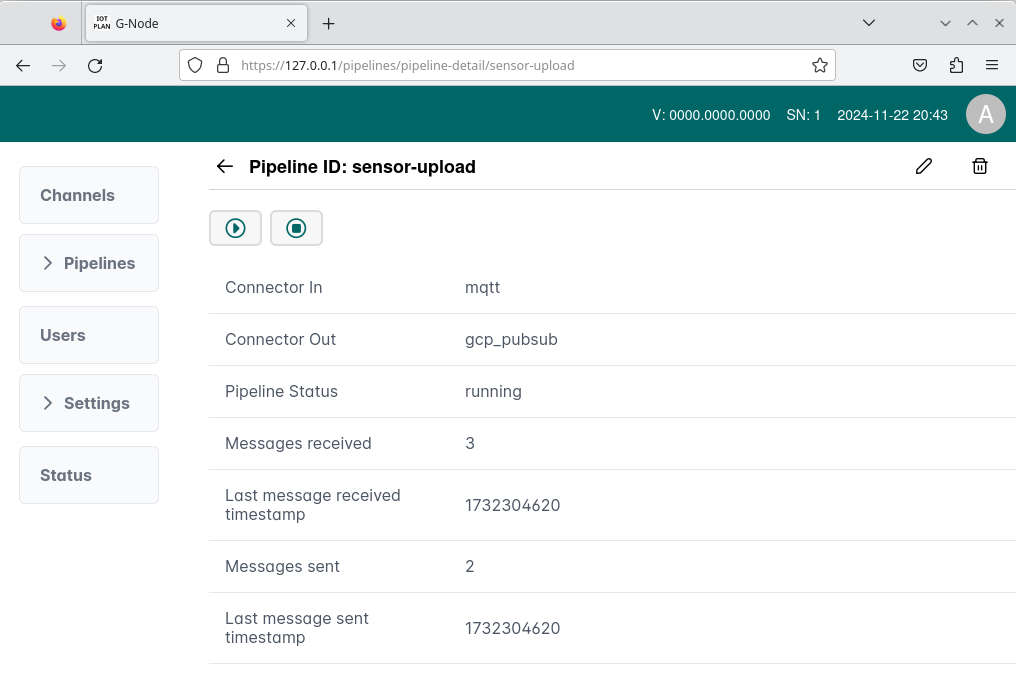
Navigate to your Pub/Sub service.
In the list of topics, click on data_s1. Create a subscription with the ID data_s1_sub for
the topic. Then, navigate to the subscription and open the MESSAGES tab. Click PULL to retrieve
messages. In the table below the button, you should see two messages with temp values of 0 and 40, similar
to the following view:
This example highlights G-Node ability to function as an MQTT broker, data processor, and streaming unit simultaneously. G-Node supports a wide range of connectors, enabling you to manage your data streams with ease and efficiency.